Saturday, January 31, 2015

Display Crashed : Kali Linux

I recently came across an issue with the Kali Linux, it was not booting into the GUI.

You might try the below steps to fix the issue, it worked for me.

My System :
  1. Host Machine : MacBook Air
  2. Host OS  : OS X Yosemite (10.10.1)
  3. Guest OS : Kali GNU/Linux
  4. VM Software : Virtual Box 4.3
Observations :
  • Tried using startx, didn't work for me
  • Tried gdm3, didn't work
Fix :
  • apt-get update
  • apt-get upgrade -y
  • apt-get install -f gdm3
  • now type gdm3, you should get your display back
Let me know your views and comments, if you have any other fixes.

Sunday, January 25, 2015

Anonymous Browsing : Using ProxyChains

This is one of the ways I use to view some links which are currently blocked by my ISP.

I do all the restricted browsing using Kali Linux. I hope you have heard of this version, you can find more info about this OS >> Here . It is an interesting playground and is bundled with extensive tools which can be used to "explore" the world around you... well be careful while exploring though ;-)

My System :
  • Host Machine : MacBook Air
  • Host OS  : OS X Yosemite (10.10.1)
  • Guest OS : Kali GNU/Linux
  • VM Software : Virtual Box 4.3
Configuring ProxyChains :

  1. ProxyChains work on TOR (Details about TOR : Here ) so you need to check if tor is currently installed and running on the system. There are several ways to do it , 1- 
    • Check if the tor file exists : ls -l /etc/init.d/tor
    • Run this command and see if you you see any active listening ports : 
      • netstat -tanp |grep tor
  2. If ProxyChains is not available, you will have to install the package using the below command:
      • apt-get install tor
  3. Once it is installed, you will have to start the service using the command below :
      • /etc/init.d/tor start
  4. Now you have to check if this has been started properly, and to confirm the port on which it has started. For that you have to re-use the command "netstat -tanp |grep tor", normally this service starts on port 9050
  5. Now once you have TOR all set, some configurations you might want to consider for using proxychains :
    1. open the proxychains.conf : vi /etc/proxychains.conf
    2. Unhash dynamic_chain and random_chain parameters
    3. add new socks4/socks5 proxies, you can get a list from : Here
    4. Make sure you do not remove the loopback address from the proxy list, and the TOR port should be same as the port here
    5. Save and close the file
  6. Now open Firefox, change the proxy settings to 127.0.0.1 and port 9050, save and close
  7. Testing : Open the site www.cmyip.com, you will now be hidden behind some other ip. If it still shows your public IP, there is a problem with your configuration.
  8. Testing : From command line , give the command as below -
    1. proxychains firefox www.cmyip.com , it will show you some other IP. (e.g as the snapshot below, I am not in Netherlands for sure :-D)
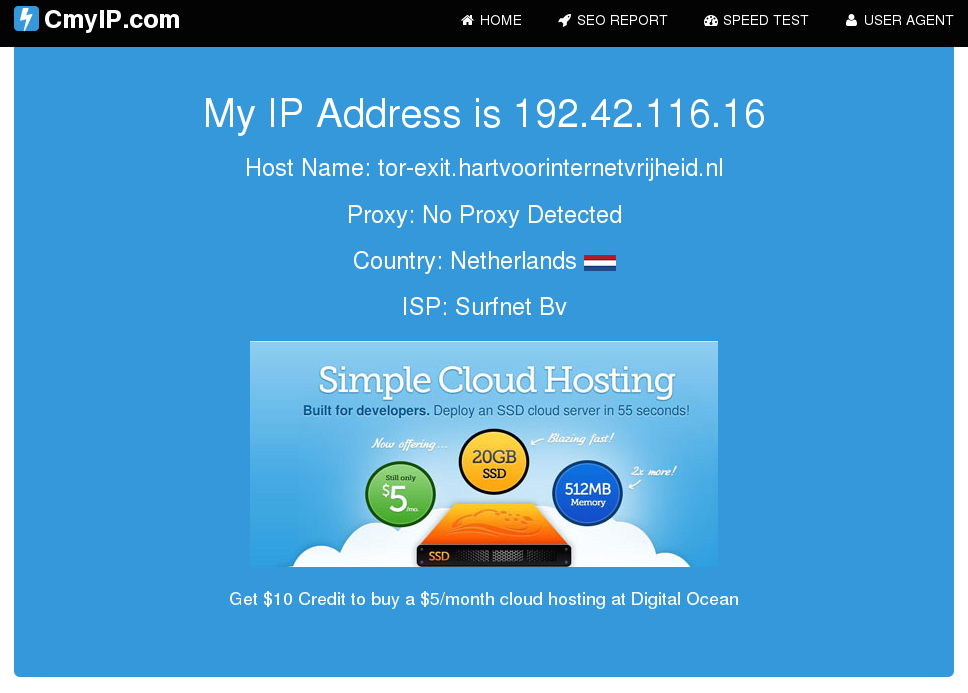
Another one, pointing to swiss.. 


I suppose the settings would be the same for other distributions of linux, happy to help if any concerns.


Saturday, January 24, 2015

No Network on XP installed as Guest on VirtualBox

In case you have been searching on the web how to fix your network issues on a recently installed Win XP on a Virtual Box this trick might help you.

My System :

  • Host Machine : MacBook Air
  • Host OS  : OS X Yosemite (10.10.1)
  • VM Software : Virtual Box 4.3
Observations :

  • Under network connections in XP you will not find any local area network or wireless network icon
  • If you go to the device manager on your XP, you will observe there is nothing under network adapters  and you will an unknown network device, which if you uninstall and scan the system again, will end up as unknown again.
  • Generally when you install XP, by default it will pick either a Bridged or a NAT'ed network. Both are fine you don't have to mess with that.
Fix :

  1. Install the VirtualBox guest additions (I expect you know about it, if you are using VB)
  2. Configure the shared folders (In windows XP, accessed the network and browsed for the folder in the network)
  3. Download the driver for Windows XP , Final Release - File name: PRO2K3XP_32.exe - You can download from Here 
  4. Put the downloaded file in the shared folder you created in step 2
  5. Install the file / driver from the Windows XP VM.
  6. And there you are, you will start seeing something happening in the task bar below, the network icon will pop and go, try browsing and you are all set.

Saturday, January 3, 2015

IBM Platform LSF Batch Commands

Below is the list of commonly used LSF batch commands and a brief description :

  1. bparams : Displays the parameters settings [Output of lsb.params file]
  2. bugroup : Display the list of user groups
  3. bmgroup : Display the list of host / machine group
  4. bhosts : Display the summary of host state [ add -l for detailed]
  5. bqueues : Display the summary of queue states in the lsf cluster. use -l for detailed
  6. busers all : Display the per user breakdown of jobs currently in the lsf batch system
  7. bjobs -u < all / user >  -a :  Displays information of the jobs which are current, recently completed 
  8. bjobs -l < job id > : Display the information in detail of a particular job id
  9. bhist : Display the time history of the job
  10. bstop : Pauses the job 
  11. bresume : Resume the job
  12. bkill : Kills the job
  13. btop : Move job in top of the queue of the user
  14. bbot : Move the job in bottom of the queue of the user
  15. bswitch : Switch the jobs from one queue to another
  16. bmodify : Modifies the submission parameters of the jobs which are pending
  17. bacct : Display accounting information of the tasks executed using LSF batch

The Azure Synapse Resource Provider Error

  If you are get the error " The Azure Synapse resource provider (Microsoft.Synapse) needs to be registered with the selected subscript...