Monday, September 7, 2015

Convert VMX,VMDK to OVF, OVA Format

Problem Statement :

I recently got a dump of a virtual machine, it was exported from VMWare hence it had the respective .vmdk's, .vmx's.. I work on a mac and use VirtualBox to host VM's. The problem begun when I tried to import the virtual machine to my laptop. You cannot import it using VirtualBox. The other option was to install VMWare player on my laptop for that VM specifically which didn't make much sense. Moreover, You would not get VMWare player free for mac, you would need to either buy VMWare Fusion or download a 30 day trial, which again does not solve my purpose.

So in essence I wanted to covert the available VMWare proprietary files in a format which can be imported on my regular VirtualBox

Fix :

There is a tool available from VMWare called OVFTool which can be used to convert the existing VMWare files in any appropriate format.

You can download this tool from here : https://www.vmware.com/support/developer/ovf/

Steps :
  • Install the OVFTool dmg.
  • Locate the package / binary. For me it was 
/Applications/VMware\ OVF\ Tool/.
  • To make it easier I did mv this folder without spaces,named the folder to "VMWareOVF" 
$sudo mv VMware\ OVF\ Tool/ VMWareOVF
  • Added this in the path variable so that "ovftool" can be run in the shell without giving the path to the command
export PATH=$PATH:/Applications/VMWareOVF/
  • Crosscheck if the path has been updated using the command "env | grep ^PATH"
PATH=/sw/bin:/sw/sbin:/usr/local/bin:/usr/bin:/bin:/usr/sbin:/sbin:/usr/X11R6/bin:/Applications/VMWareOVF/ 
  • "cd" into the folder where the VMWare files are kept. Suppose the vmx file name is "subject.vmx"
  • Create a folder by the name "OVF" where you will keep the converted "ovf" file
  • Give the below command 
$ ovftool subject.vmx OVF/convertedsubject.ovf
  • Once you give this command you would see an output screen showing the progress of the conversion
  • Once you have the converted file, you just need to import the appliance

Hope this helps you. Thanks for the read.

Sunday, August 30, 2015

The Concept of Apache Hadoop Mapreduce 2 or YARN ( Yet Another Resource Negotiator )


Introduction


Comparing to the previous versions of Hadoop, where we had the NameNode and JobTracker daemons on the Master node, MapReduce 2 or YARN was introduced to split the functionalities of JobTracker to specific daemons for resource management and job scheduling.

Comparison


If we see the diagram above, in previous versions of Hadoop, we had the cluster resource management layer tightly coupled and a part of the Mapreduce layer. In Hadoop 2.0, the we see a new layer Yet Another Resource Negotiator (YARN) has been introduced between Mapreduce and HDFS i.e. responsible for cluster resource management. 

To know the reason why this change was needed, let us first recap how it worked in Hadoop 1.0 understanding the downsides as well.


If you follow the figure above, in Hadoop 1.0 , the JobTracker is a part of the MapReduce framework which manages the MapReduce Jobs / Applications along with doing the cluster resource management. Every MapRed job is divided into a number of Map and Reduce tasks, which run on datanodes (slaves) having an assigned or limited number of tasks slots. Having said that JobTracker manages the jobs along with the cluster resource management, JobTracker keeps an account for all these tasks, the predefined task slots on machines, status of the running tasks, resource reporting and management of the cluster, re-firing task jobs incase any of the tasks failed, and finally to clean up temporary resources and release task slots once the task is complete. Additionally, the tightly integrated JobTracker is also one of the reasons why non-MapReduce applications cannot be run on the Hadoop nodes, some e.g. realtime jobs, running ad-hoc queries. Also, there can be only one JobTracker in a cluster, hence we can figure out the load this daemon alone deals with.

To summarise it, MapReduce 2.0 - YARN overcomes the below issues from MapReduce 1 :
  1. Scalability – Since the primary focus of YARN is scheduling, it can manage these huge clusters more efficiently. The ability to process data rapidly increases
  2. Compatibility with existing MapReduce based application–  YARN can easily configure and run the existing MapReduce application without any hindrance or modification in existing processes.
  3. Better Cluster Utilisation – YARN Resource Manager optimizes the cluster utilization as per the given criteria, such as capacity guarantees, fairness, and other Service Level Agreements. 
  4. Support for additional workloads apart from MapReduce – Upcoming programming models such as graph processing and iterative modelings are now a part of data processing. These new models are easily integrated with YARN, which helps the senior management in any organization to realize their real time data and other market trends.
  5. Agility – YARN facilitates the operation of the resource management layer in a more Agile manner.

Components of Mapreduce 2.0 - YARN


As mentioned in the beginning of this blog, YARN has split the JobTrackers responsibility into 2, i.e. Resource Management and Job Scheduling. Yarn achieves that using the below components
  1. Global Resource Manager (RM): This is the root of YARN, and it governs the entire cluster. It has an inbuilt scheduler, uses capacity scheduling by default. This provides resources to all applications running in the cluster. RM interacts with the Node Managers (Point 3 below) and Application Masters (Point 2 below)
  2. Application Master per Application (AM) : The Node Manager initiates the Application master container as instructed by the RM. Application master negotiates appropriate resource containers from RM, track the status and monitor the progress as well. AM is the container that controls the entire application / task.
  3. Node Manager per Node slave (NM) : The NM launches the containers, monitors the CPU, RAM, disk, network etc on the nodes and report it back to the RM to make a judgement call to cater new requests coming in. 
  4. Container per application running on Node manager : In contrast to the previous versions of Hadoop where we allocated slots to task, in MapReduce 2.0 respective NMs allocates resources per node available for an application in form of containers.
I hope this blog may help you clear the concept, will add / update more as it comes.

Cheers.


Saturday, August 22, 2015

Hadoop Basic Commands

  • List all hadoop filesystem shell commands :

$> hadoop fs

  • Help for the hadoop filesystem command :

$> hadoop fs -help

  • Print the version of Hadoop :

$> hadoop version

  • Print the content of the root directory (HDFS) :

$> hadoop fs -ls /

  • Print the amount of space used :

$> hadoop fs -df hdfs:/

  • Count the number of directory, files and bytes :

$> hadoop fs -count hdfs:/

  • Create a new directory "Subdirectory" under root :

$> hadoop fs -mkdir Root/Directory/Subdirectory

  • Upload a file A.TXT from local pathtofile to hdfs "Subdirectory" :

$> hadoop fs -put pathtofile/A.TXT /Root/Directory/Subdirectory

  • Print / show the contents of the "Subdirectory" :

$> hadoop fs -ls Root/Directory/Subdirectory

  • Delete / Remove the file A.TXT from the hdfs :

$> hadoop fs -rm Root/Directory/Subdirectory/A.TXT

  • Delete / clear / purge all files in the trash bin :

$> hadoop fs -expunge

  • Command to copy a file from local to Hadoop (Alternative to put command) :

$> hadoop fs -copyFromLocal pathtofile/A.TXT /Root/Directory/Subdirectory

  • Command to view the contents of a file on HDFS :

$> hadoop fs -cat pathtofile/A.TXT

  • Command to copy a file from Hadoop FS to Local (Alternative to get command) :

$> hadoop fs -copyToLocal /Root/Directory/Subdirectory /pathtolocal/A.TXT 

  • Copying files between 2 HDFS directories :

$> hadoop fs -cp /path/to/hadoop1/*.txt /path/to/hadoop2/

  • Download file A.TXT from HDFS to local path :

$> hadoop fs -get hadoop/A.txt /path/to/local

  • Unix Tail command on hadoop fs (HDFS)n:

$> hadoop fs -tail path/to/hadoop/A.TXT

I also keep some articles in "www.itsmadeinindia.net"

Hope this helps.

Sunday, May 31, 2015

Hadoop Installation Modes

In my previous blogpost we read about BigData, we also discussed about some vendors who provide distributions of hadoop for implementations of BigData Analysis and Computation.The one which is ideal for us to evaluate Hadoop is Apache Hadoop.

Apache Hadoop is a framework for running applications on large cluster built of commodity hardware. The Hadoop framework transparently provides applications both reliability and data motion. Hadoop implements a computational paradigm named Map/Reduce, where the application is divided into many small fragments of work, each of which may be executed or re-executed on any node in the cluster. In addition, it provides a distributed file system (HDFS) that stores data on the compute nodes, providing very high aggregate bandwidth across the cluster. Both MapReduce and the Hadoop Distributed File System are designed so that node failures are automatically handled by the framework.

Before we install hadoop for evaluation we also need to be understand that we can install Hadoop in 3 different modes depending on the requirement.
  1. Stand Alone Mode (Single Node Cluster): All deamons (HBase, ZooKeeper etc) runs inside a single JVM process. It uses local storage instead of a DFS (Distributed File System). This mode is generally used for testing and debugging purposes.
  2. Pseudo Distributed Mode (Single Node Cluster): Each Hadoop Deamon runs on a separate JVM process, hence there will be multiple JVM processes running on the same machine or node. This is used to mimic fully distributed hadoop setup. Good for testing and prototyping, however this should not be used in production as this will lead to performance issues.
  3. Fully Distributed mode (Multi Node Cluster): In this mode, all the deamons are scattered across several commodity machines, DFS is leveraged. Centralised data structure allows multiple machines to contribute processing powers and storage to the cluster.
We will see the installation and configuration steps in my next post.. 

Wednesday, May 20, 2015

What is Big Data ?

This has been a buzzword ( with cloud computing ), in the IT ecosystem.

If you google "Big Data" , you end up with several definitions. But interestingly you will find that most of the definitions are derived from a Gartner whitepaper which was published in 2001 defining the 3D Data Model written by "Doug Laney". As per the paper, traditional data management techniques were not enough to meet the needs and called for a change in the approach. The reason for which is the changing nature of Data Volume, Data Velocity, Data Variety.

Now putting that in terms of defining what big data is, simply it is the data that is too large and complex to be handled by the standard / primitive database technologies used by organisations. There are certain attributes which are assessed and to define the data to be "big". The attributes are below :

  1. Volume : As per definition, it is the huge volumes of data which are generated in today's world, Some examples are the social networking sites like Facebook, Twitter and websites like YouTube where on a daily basis millions of users around the globe are active. "From 2005 to 2020, the measure of all data created, replicated and consumed in a single year will grow by a factor of 300, from 130 exabytes to 40,000 exabytes, or 40 trillion gigabytes (more than 5,200 gigabytes for every man, woman, and child in 2020). From now until 2020, the digital universe will about double every two years " - From The Digital Universe in 2020 whitepaper by EMC. Big Data deals in the volumes in tune of Terabytes,Petabytes, Exabytes,Zettabytes
  2. Velocity : Velocity of the data is the speed in which it is being created, stored and analysed. We read about the examples of sites which are creating high volumes of data. With an increased usage of these platforms and creation of similar platforms in future, I think it will be a fair call to say that the velocity in which the data is being created is unimaginable and cannot be measured. If we go through the official statistics of YouTube alone, 300 hours of video are uploaded to YouTube every minute. And the official statistics of Facebook says that there are 936 million daily active users on average for March 2015.  Bigdata also deals in performing analytics on the huge data being generated at this pace often at realtime and which requires immediate response.
  3. Variety : Earlier, the data to be managed was more structured but with the change in the requirements, we needed a system which can fit data of all kinds i.e. Structured, unstructured, different formats. Big Data deals with that requirement.
We discussed the 3 key V's , which defines "Big Data". But with further implementations and usage of Big Data, there were additional V's which were added by different organisations which are worth to consider if the result of your Big Data processes is critical to you and your business. However, I feel these additional V's does not define Big Data, it is more of what you desire to have when you plan a Big Data implementation.

The 4 additional V's are as below:
  1. Veracity : We discussed about "Big Data" above, which means a variety of data in large volumes which is complex and generated and accessed in realtime. This additional V talks about the Truthfulness and accuracy of the data. We could assess the integrity of the data on the structured and primitive databases by applying normalisation techniques. With Big data we use different tools and algorithms which can assess the data to be meaningful and true for the business, which is also important for the business to reduce cost on storing and processing of data which is not of use.
  2. Validity : This is quite close to what I just mentioned above, Veracity. However, this is more related of the quality and accuracy of the data with regard to the intended usage. Data may not have veracity issues, but it might not be valid if it is not properly understood. On the contrary the same set of data might be valid for one application, but not for another, hence it is important to verify a relationship to some extent between the elements of data we are dealing with. It is more related to drawing logical inferences from the matching data
  3. Value : This refers to the value added by the variety of data in large volumes which is complex and generated and accessed in realtime. Data value must exceed its cost, ownership and management. Data alone is not valuable, the value is actually in how we transition the data to meaningful information and knowledge which will assist the organisations which rely heavily on data analysis for decision making. Big data adds value by providing complex, advanced, predictive business analysis and insights.
  4. Visibility : Some definitions replace this V with Visualisation as well, which actually defines more or less the same aspect that the variety of data in large volumes which is complex and generated and accessed at realtime should be visible or can be visualised using tools etc, else the data from disparate resources which is available in Big Data and not visible is not of any use.
You can find an opensource distribution from Apache to implement and test Big Data in your environment. There are some other vendors as well for for big data distributions, naming a few are cloudera, MapR. Some key Data Management vendors include Datastax and IBM.

I hope the above gives you some idea what "Big Data" is all about, this being one of the biggest post of mine so I will coin this post as my "Big Post" ;-).

I plan to write more about the architecture and how to setup your own environment using the Apache Hadoop distribution in coming weeks, your feedback / ideas are appreciated.

So, is your data "Big" enough ?........ Thanks for reading the post. 

Saturday, January 31, 2015

Display Crashed : Kali Linux

I recently came across an issue with the Kali Linux, it was not booting into the GUI.

You might try the below steps to fix the issue, it worked for me.

My System :
  1. Host Machine : MacBook Air
  2. Host OS  : OS X Yosemite (10.10.1)
  3. Guest OS : Kali GNU/Linux
  4. VM Software : Virtual Box 4.3
Observations :
  • Tried using startx, didn't work for me
  • Tried gdm3, didn't work
Fix :
  • apt-get update
  • apt-get upgrade -y
  • apt-get install -f gdm3
  • now type gdm3, you should get your display back
Let me know your views and comments, if you have any other fixes.

Sunday, January 25, 2015

Anonymous Browsing : Using ProxyChains

This is one of the ways I use to view some links which are currently blocked by my ISP.

I do all the restricted browsing using Kali Linux. I hope you have heard of this version, you can find more info about this OS >> Here . It is an interesting playground and is bundled with extensive tools which can be used to "explore" the world around you... well be careful while exploring though ;-)

My System :
  • Host Machine : MacBook Air
  • Host OS  : OS X Yosemite (10.10.1)
  • Guest OS : Kali GNU/Linux
  • VM Software : Virtual Box 4.3
Configuring ProxyChains :

  1. ProxyChains work on TOR (Details about TOR : Here ) so you need to check if tor is currently installed and running on the system. There are several ways to do it , 1- 
    • Check if the tor file exists : ls -l /etc/init.d/tor
    • Run this command and see if you you see any active listening ports : 
      • netstat -tanp |grep tor
  2. If ProxyChains is not available, you will have to install the package using the below command:
      • apt-get install tor
  3. Once it is installed, you will have to start the service using the command below :
      • /etc/init.d/tor start
  4. Now you have to check if this has been started properly, and to confirm the port on which it has started. For that you have to re-use the command "netstat -tanp |grep tor", normally this service starts on port 9050
  5. Now once you have TOR all set, some configurations you might want to consider for using proxychains :
    1. open the proxychains.conf : vi /etc/proxychains.conf
    2. Unhash dynamic_chain and random_chain parameters
    3. add new socks4/socks5 proxies, you can get a list from : Here
    4. Make sure you do not remove the loopback address from the proxy list, and the TOR port should be same as the port here
    5. Save and close the file
  6. Now open Firefox, change the proxy settings to 127.0.0.1 and port 9050, save and close
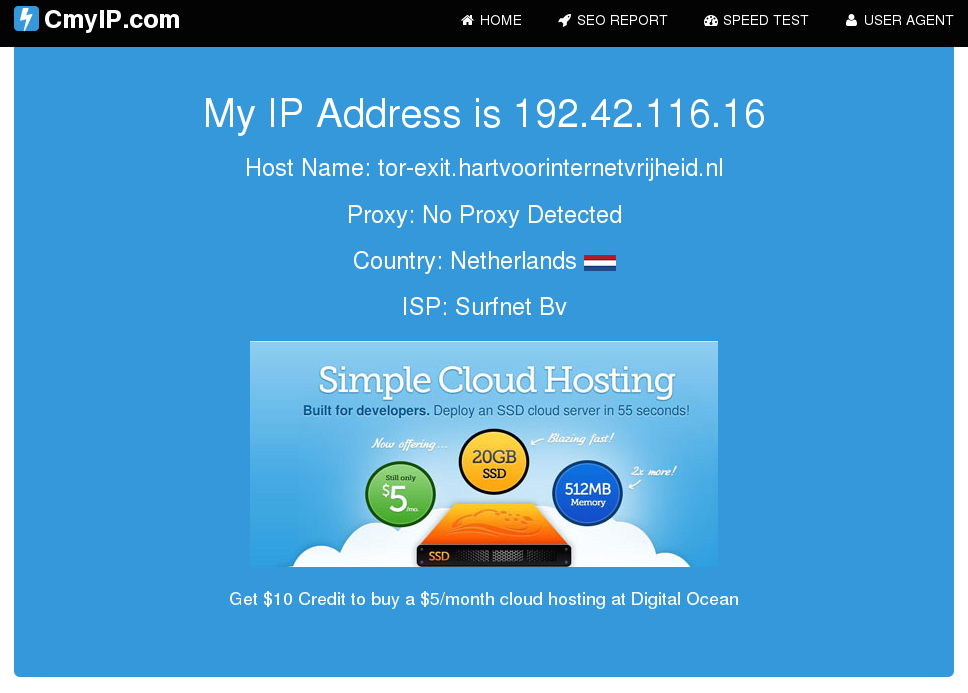
  7. Testing : Open the site www.cmyip.com, you will now be hidden behind some other ip. If it still shows your public IP, there is a problem with your configuration.
  8. Testing : From command line , give the command as below -
    1. proxychains firefox www.cmyip.com , it will show you some other IP. (e.g as the snapshot below, I am not in Netherlands for sure :-D)

Another one, pointing to swiss.. 


I suppose the settings would be the same for other distributions of linux, happy to help if any concerns.


Saturday, January 24, 2015

No Network on XP installed as Guest on VirtualBox

In case you have been searching on the web how to fix your network issues on a recently installed Win XP on a Virtual Box this trick might help you.

My System :

  • Host Machine : MacBook Air
  • Host OS  : OS X Yosemite (10.10.1)
  • VM Software : Virtual Box 4.3
Observations :

  • Under network connections in XP you will not find any local area network or wireless network icon
  • If you go to the device manager on your XP, you will observe there is nothing under network adapters  and you will an unknown network device, which if you uninstall and scan the system again, will end up as unknown again.
  • Generally when you install XP, by default it will pick either a Bridged or a NAT'ed network. Both are fine you don't have to mess with that.
Fix :

  1. Install the VirtualBox guest additions (I expect you know about it, if you are using VB)
  2. Configure the shared folders (In windows XP, accessed the network and browsed for the folder in the network)
  3. Download the driver for Windows XP , Final Release - File name: PRO2K3XP_32.exe - You can download from Here 
  4. Put the downloaded file in the shared folder you created in step 2
  5. Install the file / driver from the Windows XP VM.
  6. And there you are, you will start seeing something happening in the task bar below, the network icon will pop and go, try browsing and you are all set.

Saturday, January 3, 2015

IBM Platform LSF Batch Commands

Below is the list of commonly used LSF batch commands and a brief description :

  1. bparams : Displays the parameters settings [Output of lsb.params file]
  2. bugroup : Display the list of user groups
  3. bmgroup : Display the list of host / machine group
  4. bhosts : Display the summary of host state [ add -l for detailed]
  5. bqueues : Display the summary of queue states in the lsf cluster. use -l for detailed
  6. busers all : Display the per user breakdown of jobs currently in the lsf batch system
  7. bjobs -u < all / user >  -a :  Displays information of the jobs which are current, recently completed 
  8. bjobs -l < job id > : Display the information in detail of a particular job id
  9. bhist : Display the time history of the job
  10. bstop : Pauses the job 
  11. bresume : Resume the job
  12. bkill : Kills the job
  13. btop : Move job in top of the queue of the user
  14. bbot : Move the job in bottom of the queue of the user
  15. bswitch : Switch the jobs from one queue to another
  16. bmodify : Modifies the submission parameters of the jobs which are pending
  17. bacct : Display accounting information of the tasks executed using LSF batch

Thursday, December 18, 2014

Using Heimdall MacOS to Install Stock ROM on Galaxy S2

I have always played with my Samsung Handsets (Rooting, Multi-Booting, trying different ROMs) using the standard Odin software on Windows. Somehow have never loved the easy life on Windows and always fancied to work on the Macintosh OS (Being from a Unix Background, I liked it even more). I own an Apple MacBook Air, and have been doing a lot of stuff lately using it.

The latest was trying to install the stock rom on my Galaxy S2. The steps I followed will be briefed in the below blog.

Pre-requisites

1- Samsung S2 phone (Or any other phone model)
2- USB Cable
3- Battery at-least 50% charged
4- Download the required Stock Rom (can use http://stockroms.net)
5- Install heimdall-suite-1.4.0-mac.dmg on your Mac. Download here

In my case I downloaded ICS Stock Rom for Galaxy S2


Step 1 : Connect your phone

A- Open Heimdall
B- Connect the USB cable on the phone
C- Restart the phone in download mode (Vol Down + Power + Home)
D- Vol UP to continue download mode
E- In Heimdall GUI, click on Utilities
F- Click on detect on the top left. The output should say "Device detected", if not, repeat the steps again from B.

Step 2 : Download the current PIT file.

If you need to save your current partition instruction table, you have to create a PIT file of the current set up.

A - Follow step 1 to connect phone
B- Once device is connected, in Utilities screen, click on save as.
C- Give a path where you want to save the PIT file
D- Click on download. This will download the pit file on the location you mention. If it hangs in the process anywhere, repeat the steps and try

Output Screen Heimdall+++++++++++++++++++++++++++++++

Successful Rom Updates using Macbok - Heimdall

Heimdall v1.4.0

Copyright (c) 2010-2013, Benjamin Dobell, Glass Echidna
http://www.glassechidna.com.au/

This software is provided free of charge. Copying and redistribution is
encouraged.

If you appreciate this software and you would like to support future
development please consider donating:
http://www.glassechidna.com.au/donate/

Initialising connection...
Detecting device...
Claiming interface...
Setting up interface...

Initialising protocol...
Protocol initialisation successful.

Beginning session...

Some devices may take up to 2 minutes to respond.
Please be patient!

Session begun.

Downloading device's PIT file...
PIT file download successful.

Output Ends++++++++++++++++++++++++++++++++++++++++


Step 3 : Installing the ROM

The ROM you download, should have the below mentioned files to continue install


A - Follow Step 1 and Step 2 above
B- Click on Flash in Heimdall GUI frontend
C- Browse the PIT which you downloaded in Step 2, Once you do that the partition name field gets active
D- Select Partition name and assign respective files from the ROM which you need to install e.g

BOOT=boot.bin
CACHE=cache.img
FACTORYFS=factoryfs.img
HIDDEN=hidden.img
MODEM=modem.bin
PARAM=param.lfs
SB1=SbI.bin
KERNEL=zimage

E- Then click start. The magic will begin. Post install the phone will reboot, and Heimdall GUI fronted will look as below :


Output Screen Heimdall+++++++++++++++++++++++++++++++

Successful Rom Updates using Macbok - Heimdall

Heimdall v1.4.0

Copyright (c) 2010-2013, Benjamin Dobell, Glass Echidna
http://www.glassechidna.com.au/

This software is provided free of charge. Copying and redistribution is
encouraged.

If you appreciate this software and you would like to support future
development please consider donating:
http://www.glassechidna.com.au/donate/

Initialising connection...
Detecting device...
Claiming interface...
Setting up interface...

Initialising protocol...
Protocol initialisation successful.

Beginning session...

Some devices may take up to 2 minutes to respond.
Please be patient!

Session begun.

Uploading BOOT
0%
100%

BOOT upload successful

Uploading SBL1
0%
80%
100%

SBL1 upload successful

Uploading PARAM
0%
94%
100%

PARAM upload successful

Uploading KERNEL
0%
12%
25%
37%
50%
62%
75%
87%
100%

KERNEL upload successful

Uploading CACHE
0%
5%
10%
16%
21%
27%
32%
38%
43%
49%
54%
60%
65%
71%
76%
82%
87%
93%
98%
100%

CACHE upload successful

Uploading MODEM
0%
8%
16%
24%
33%
41%
49%
58%
66%
74%
83%
91%
99%
100%

MODEM upload successful

Uploading FACTORYFS
0%
1%
2%
3%
4%
5%
6%
7%
8%
9%
10%
11%
12%
13%
14%
15%
16%
17%
18%
19%
20%
21%
22%
23%
24%
25%
26%
27%
28%
29%
30%
31%
32%
33%
34%
35%
36%
37%
38%
39%
40%
41%
42%
43%
44%
45%
46%
47%
48%
49%
50%
51%
52%
53%
54%
55%
56%
57%
58%
59%
60%
61%
62%
63%
64%
65%
66%
67%
68%
69%
70%
71%
72%
73%
74%
75%
76%
77%
78%
79%
80%
81%
82%
83%
84%
85%
86%
87%
88%
89%
90%
91%
92%
93%
94%
95%
96%
97%
98%
99%
100%

FACTORYFS upload successful

Uploading HIDDEN
0%
1%
2%
3%
4%
5%
6%
7%
8%
9%
10%
11%
12%
13%
14%
15%
16%
17%
18%
19%
20%
21%
23%
24%
25%
26%
27%
28%
29%
30%
31%
32%
33%
34%
35%
36%
37%
38%
39%
40%
41%
42%
43%
44%
46%
47%
48%
49%
50%
51%
52%
53%
54%
55%
56%
57%
58%
59%
60%
61%
62%
63%
64%
65%
66%
67%
69%
70%
71%
72%
73%
74%
75%
76%
77%
78%
79%
80%
81%
82%
83%
84%
85%
86%
87%
88%
89%
90%
92%
93%
94%
95%
96%
97%
98%
99%
100%

HIDDEN upload successful

Ending session...
Rebooting device...
Releasing device interface...


Output Ends++++++++++++++++++++++++++++++++++++++++

Enjoy Flashing your handset.... Cheers.


Monday, July 7, 2014

Wireless Festival 2014 - Birmingham

Ever since I have moved to UK have been planning to visit the music festivals...

I was just browsing the internet when I saw the line-up of Wireless Festival which was jaw dropping and irresistible. Bruno Mars, Ellie Goulding, Sean Paul, John Newman all together (Though I so wished if Ed Sheeran would have been there too..) .. Amazing isn't it ?

I booked my tickets and yayy waited for 05th of July 2014 !!

The day came when me and my wife travelled for the festival and it was one of the best events I have ever attended in my life, so well organised and with the best line-ups in the house.


The main stage was huge !! there were 2 other stages , the future stage and the bum bum stage.


John Newman showed some awesome moves !! This guy is talented, a good performer..


Then it was Ellie Goulding time... I have been following her since quite a long time when she was more into vocals for trance music.. she rocked the stage !!


I also took a video of her, performing the starry eyed.. her oldie track..


Then it was time for the headliner act, there were more performances in between, including OutKast, don't follow them to be honest, so just headed far from the stage and rested for a while to rush back to the main stage for Bruno..

Bruno arrived, with a massive entry, he nailed it totally as every single person in the festival just couldn't stop dancing ! He was supported by some good moves by his team on stage and splendid fireworks and lights ..


Thanks to the British Weather all this while.. The Rain God was kind, scared us for a bit, but eventually was an awesome weather throughout the day !!!


A glimpse of the performance of Bruno Mars .. 


Overall, this has been the best ever experience of my lifetime.. and I surely look forward for it next time.. Psst.. next year please get Rihana, Katy, Eminem, Ed Sheeran :P

Cheers..


The Azure Synapse Resource Provider Error

  If you are get the error " The Azure Synapse resource provider (Microsoft.Synapse) needs to be registered with the selected subscript...